LIPS® Developer Documentation
  • WELCOME
    • LIPS® Developer Documentation
    • About 3D Depth Cameras
    • Depth Image
    • Understanding Depth
    • An Ideal Depth Camera
    • LIPSedge™ AE Series Camera Selection Guide
  • LIPSedge™ SDK 1.x
    • LIPSedge™ SDK 1.x
    • Benefits from LIPSedge™ SDK implementation
    • LIPSedge™ SDK 1.x Installation Architecture
    • How to identify each camera SDK
    • New Features for v1.02
      • Installing and identifying packages on Windows
      • Saving Captures and Videos with the DepthViewer
      • Saving Point Cloud with PointCloudViewer
      • Live On-Screen displaying Depth, FPS
      • Live On-Screen displaying XYZ parameters in RawfileViewer
      • Distance measurement on-screen from point-to-point
      • Mouse Pointer Change
      • LIPSedge™ AE and S series Colormap new feature addition
      • Simple naming for LIPSedge™ SDK Tools
      • Importing parameters from .json files for LIPSedge™ AE and S series
    • LIPSedge™ SDK v1.02 Tools
      • DepthViewer
      • PointCloudViewer
      • CameraParameterViewer
      • CameraCenterViewer
      • CameraEventListener
      • CameraPowerTest
      • LensModeSelector
      • LIPSImuReader
      • CameraSimpleViewer
      • RawFileViewer
    • Features Articles
      • LIPSedge™ SDK Persistent Connection for PoE and USB
    • Tutorials
    • Development and Deployment on arm64
  • DOCUMENTS, INSTALLATION & SETUP
    • LIPSedge™ AE400 / AE450
      • User Guide
        • Previous Releases (Archive)
      • SDK Release
        • Previous Releases (Archive)
      • Installation
        • Linux
        • Windows
        • ROS Wrapper
        • NVIDIA ISAAC Wrapper
        • Persistent Connection
      • STEP files for CAD Use
      • Certifications Documents
      • Firmware
    • LIPSedge™ AE430 / AE470
      • User Guide
        • Previous Releases (Archive)
      • SDK Release
        • Previous Releases (Archive)
      • Firmware
      • STEP files for CAD Use
    • LIPSedge™ AE430-DK / AE470-DK
      • User Guide
    • LIPSedge™ DL & M3 Series
      • User Guide
        • Previous Releases (Archive)
      • SDK Release
        • Previous Releases (Archive)
        • Changelog
      • STEP files for CAD Use
      • Installation
        • Ubuntu
        • Windows
    • LIPSedge™ L215u / L210u
      • User Guide
        • Previous Releases (Archive)
      • SDK Release
        • Previous Releases (Archive)
        • Changelog
      • Installation
        • Windows
        • Linux
      • STEP files for CAD Use
    • LIPSFace™ HW110/115 On-Device 3D Facial Recognition
      • User Guide & SDK Download
      • STEP files for CAD Use
    • LIPSFace™ HW120/125 On-Device 3D Facial Recognition
      • User Guide
      • SDK
      • STEP files for CAD Use
    • LIPScan 3D ™ Middleware
      • LIPScan 3D™ SDK
        • SDK Download
          • Previous Releases
        • User Guide
        • Release Notes
    • LIPSMetric™ HA110 Handheld Dimensioner
      • User Guide
    • LIPSMetric™ ST115 Static Dimensioner
      • User Guide
    • LIPSMetric™ ST130 Pallet Dimensioner
      • User Guide
  • LIPSedge™ SDK Languages & Libraries
    • C++
      • environment-setup
      • hello-lipsedge-sdk
      • opencv-viewer
      • roi
      • depth-data
      • align-depth-color
      • range-filter
      • remove-background
      • record
      • pointcloud
      • config-resolution
      • camera-parameter
    • Python
      • environment-setup
      • hello-lipsedge-sdk
      • opencv-viewer
      • roi
      • depth-data
      • align-depth-color
      • range-filter
      • remove-background
      • record
    • Java
      • ni-hello
    • C#
      • ni-hello
      • simple-read
    • OpenCV
  • LIPSedge™ SDK Frameworks
    • GenICam (for Halcon / Aurora Vision)
      • User Manual
      • Driver(.cti) and Nodemap (.xml)
      • Supported LIPSedge™ Camera SDK
      • Installation Example
    • ROS
    • ROS2
    • NVIDIA Isaac Wrapper
    • Flutter
  • LIPSedge™ SDK Sample Codes
    • Sample Applications & Viewer & Utilities
      • ni-viewer
      • ni-pointcloud-gl
      • ni-camera-matrix
  • LIPSFace™ SDK
    • LIPSFace™ SDK Overview
    • Updates
Powered by GitBook
On this page
  • Overview
  • Expect Output
  • Prerequisite
  • Windows
  • Linux
  • Tutorial
  • Full code
  1. LIPSedge™ SDK Languages & Libraries
  2. C++

pointcloud

PreviousrecordNextconfig-resolution

Last updated 8 months ago

Overview

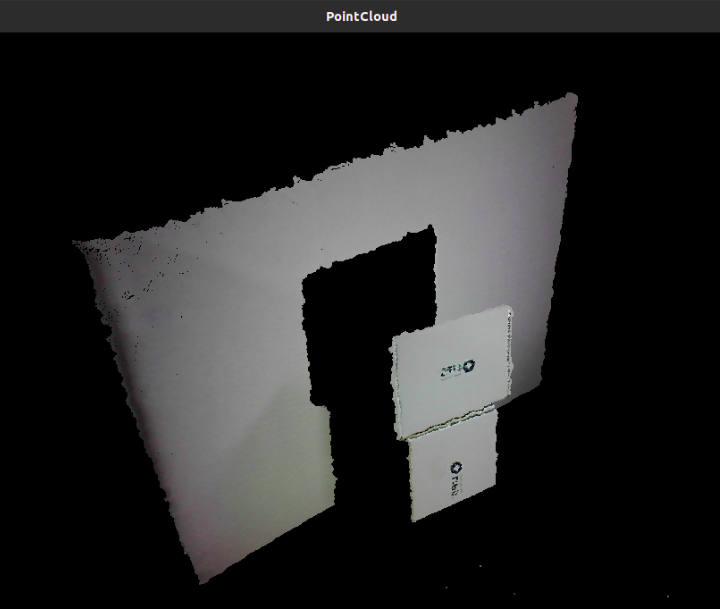
Use depth value to calculate point cloud. Using OpenGL(GLFW) to display.

Expect Output

Prerequisite

To use OpenGL, we need to install GLFW library.

Windows

// CMakeLists.txt
...
include_directories("GLFW_HEADER_PATH")
link_directories("GLFW_LIBRARY_PATH")

target_link_libraries(${PROJECT_NAME} glfw GLU GL)
...

Linux

Install by apt.

sudo apt-get install libglfw3-dev

Add linked libraries in CMakeLists.txt

// CMakeLists.txt
...
target_link_libraries(${PROJECT_NAME} glfw GLU GL)
...

Tutorial

We declare pointData to store the pointcloud data of each voxel, including its depth value, coordinate in world coordinate system and the color value of that point.

struct pointData
{
    unsigned short depth;
    float worldX, worldY, worldZ;
    float r, g, b;
};

In computeCloud function, we get the color and depth frame. Then loop each depth value, use convertDepthToWorld to covert to world coordinate system. Also, we get the color value of each point from RGB color frame.

void computeCloud(int width, int height, VideoStream &depth, VideoStream &color, VideoFrameRef &colorFrame, VideoFrameRef &depthFrame)
{
    color.readFrame(&colorFrame);
    depth.readFrame(&depthFrame);

    const openni::DepthPixel *pDepth = (const openni::DepthPixel *)depthFrame.getData();
    const openni::RGB888Pixel *pColor = (const openni::RGB888Pixel *)colorFrame.getData();

    float fX, fY, fZ;

    for (int y = 0, i = 0; y < height; y++)
    {
        for (int x = 0; x < width; x++)
        {
            fX = 0.0;
            fY = 0.0;
            fZ = 0.0;
            pointsData[i].depth = pDepth[i];

            if (pDepth[i] != 0)
            {

                openni::CoordinateConverter::convertDepthToWorld(depth, x, y, pDepth[i], &fX, &fY, &fZ);

                pointsData[i].worldX = fX;
                pointsData[i].worldY = fY;
                pointsData[i].worldZ = fZ;

                pointsData[i].r = pColor[i].r / 255.0;
                pointsData[i].g = pColor[i].g / 255.0;
                pointsData[i].b = pColor[i].b / 255.0;
            }
            i++;
        }
    }

    return;
}

In main function, we first initialize the camera like we did before. Make sure to enable image registration to align depth and color frame.

    OpenNI::initialize();

    Device device;
    if (device.open(ANY_DEVICE) != STATUS_OK)
    {
        std::cout << "No device connect\n";
        return -1;
    }

    device.setImageRegistrationMode(openni::IMAGE_REGISTRATION_DEPTH_TO_COLOR);

    // Color
    VideoStream color;
    color.create(device, SENSOR_COLOR);
    color.start();
    VideoFrameRef colorFrame;

    // Depth
    VideoStream depth;
    depth.create(device, SENSOR_DEPTH);
    depth.start();
    VideoFrameRef depthFrame;

Then we initialize GLFW and create the window.

glfwInit();
GLFWwindow *window = glfwCreateWindow(1280, 720,"PointCloud", NULL, NULL);
if (!window)
{
    glfwTerminate();
    return false;
}
glfwMakeContextCurrent(window);

In the window, we want to use mouse or keyboard to change to view angle. First we declare a ViewerState struct to store the current view angle information.

struct viewerState
{
    double yaw;
    double pitch;
    double lastX;
    double lastY;
    float offset;
    float lookatX;
    float lookatY;
    bool mouseLeft;
    bool mouseRight;
};

After creating GLFW window, we use four different callbacks to handle keyboard or mouse interaction.

glfwSetMouseButtonCallback(window, mouse_button_callback);
glfwSetScrollCallback(window, scroll_callback);
glfwSetCursorPosCallback(window, cursor_position_callback);
glfwSetKeyCallback(window, key_callback);

In main while loop, we compute the pointcloud then use GLFW functions to keep refresing window.

while (!glfwWindowShouldClose(window))
{
    glfwPollEvents();

    computeCloud(depthWidth, depthHeight, depth, color, colorFrame, depthFrame);

    ...
    // Render pointcloud
    ...

    glfwSwapBuffers(window);
}

To render each point on screen, first we change the view angle base on current viewerState value.

int windowWidth, windowHeight;
glfwGetFramebufferSize(window, &windowWidth, &windowHeight);

glViewport(0, 0, windowWidth, windowHeight);
glClearColor(0.0, 0.0, 0.0, 1);
glClear(GL_COLOR_BUFFER_BIT | GL_DEPTH_BUFFER_BIT);
glMatrixMode(GL_PROJECTION);
glLoadIdentity();
gluPerspective(60, (float)windowWidth / windowHeight, 0.01f, 100000.0f);
glMatrixMode(GL_MODELVIEW);
glLoadIdentity();
gluLookAt(viewerStat.lookatX, viewerStat.lookatY, 0, viewerStat.lookatX, viewerStat.lookatY, 1, 0, 1, 0);

glPointSize(windowWidth / 640.0);
glEnable(GL_DEPTH_TEST);

glTranslatef(0, 0, viewerStat.offset);
glRotated(viewerStat.pitch, 1, 0, 0);
glRotated(viewerStat.yaw, 0, 1, 0);
glTranslatef(0, 0, -0.5f);

Then actually render each point with the coordinate and color value we get from computePointCloud.

glBegin(GL_POINTS);
for (int i = 0; i < (depthWidth * depthHeight); i++)
{
    if (pointsData[i].depth != 0)
    {
        glColor3f(pointsData[i].r, pointsData[i].g, pointsData[i].b);
        glVertex3f(pointsData[i].worldX, pointsData[i].worldY, pointsData[i].worldZ);
    }
}
glEnd();

Full code

Download prebuilt from . Unzip then set the path in CMakeList.txt

OpenCV Viewer
GFLW
pointcloud.cpp